Saturday, 23 April 2011
Terracotta Chiminea - Tutorial
Hi all, I have been waiting for my latest mini make to dry so I could post it. I saw this picture of a terracotta chiminea on the internet and finally got round to having a go at making one in 1/12 scale.
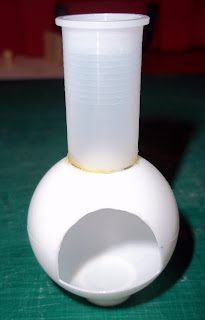
It is actually very easy to make. You start with the basic shape of the chiminea which is made from a ping pong ball and some plastic tube.
Using a craft knife you need to cut the hole in the front of the chiminea from the ping pong ball, it is quite easy to do as long as your craft knife is sharp and you draw the shape on the ping pong ball first. Make sure to make the hole bigger than the one you want to end up with as it will get smaller once you cover it with clay.
Cut a piece of plastic tube 3cm long and stick it on the top using contact adhesive. Cut a piece 4mm long and stick it on the bottom as a base. Make sure it stands up straight.
The next step is to cover it all in DAS terracotta air dry clay. Roll it out to approx 2mm thick. I used a pasta machine for this. You need to coat the ping pong and tube base with PVA glue to get the DAS to stick. Cut pieces to cover the inside and outside of the entire thing.
it doesn't matter about any joins, you can just rub them together with a wet finger till they disappear. Make sure you fill any gaps with small pieces of clay. Leave to dry.
Once it is completely dry inside and out you can smooth over the surface to remove any bumps and tidy up the edges of the hole. Do this with a small piece of sandpaper or a emery board in circular motions to avoid getting lines on the terracotta. Brush off all the dust and you are finished.
Then you can put some logs in it and put it in your mini garden...
Subscribe to:
Post Comments (Atom)


That is gorgous - thanks for sharing this project. I am going to have a go at this :)
ReplyDeleteGreat idea, thank you for telling how to make it.
ReplyDeleteLove it.
Mona
Such a smart idea! I have one,too- but I used a little gourd as my fireplace... But I like how you covered your with clay- makes it look real:)
ReplyDeleteBrilliant! Thank you for sharing :)
ReplyDeleteKisses from Venice, Italy
The chiminea is beautiful, it looks real. Thank you for the tutorial. Regards from Craftland
ReplyDelete